Auto-Scaling Groups
Overview
Auto-scaling provides an automated mechanism for managing the number of VM instances. Instances will automatically be created or deleted in case of failure or changes in application load, thus assuring that the right number of instances are always available.
To implement auto-scaling, create collections of VM instances, called scaling groups. A simple auto-scaling group can be created with a specified number of instances. The auto-scaling group will maintain the specified number of instances by creating a new instance to replace an instance which fails.
Policies can be added to an auto-scaling group in order to instruct the group to maintain a performance metric as close as possible to a threshold. For example, if a threshold is set for 50% CPU load, the auto-scaling group will automatically create or terminate instances as the application load changes, so that CPU usage will not exceed the specified threshold.
An auto-scaling group can also detect faulty instances, terminate them, and create new instances to replace them.
Auto-scaling can be implemented on target groups, so that instances created through auto-scaling, are automatically associated with the same target group. This ensures that traffic load forwarded to a target group will include instances created with auto-scaling.
For easier classification of VMs, tags can be created and applied to auto-scaling groups. Based on the auto-scaling group configuration, tags can be automatically propagated to VM instances during their launch.
Implementing Auto-scaling Groups
Auto-scaling group implementation includes the following:
Creation of a launch configuration template which specifies the type of VM instances created with auto-scaling. For example, a launch configuration would specify the image to be used, instance type, key pairs, and security groups. When an auto-scaling group automatically adds a new VM instance, the new VM inherits the characteristics defined in the scaling group’s launch configuration.
Specification of parameters related to the auto-scaling group such as the number of instances that are available to the group, the metrics to monitor when determining appropriate group size, the type of health checks to use, and various other settings.
Creating Launch Configurations
To create a launch configuration:
Navigate to the Compute > Launch Config view and select Create. The Create Launch Configuration window is displayed with two tabs: details and images.
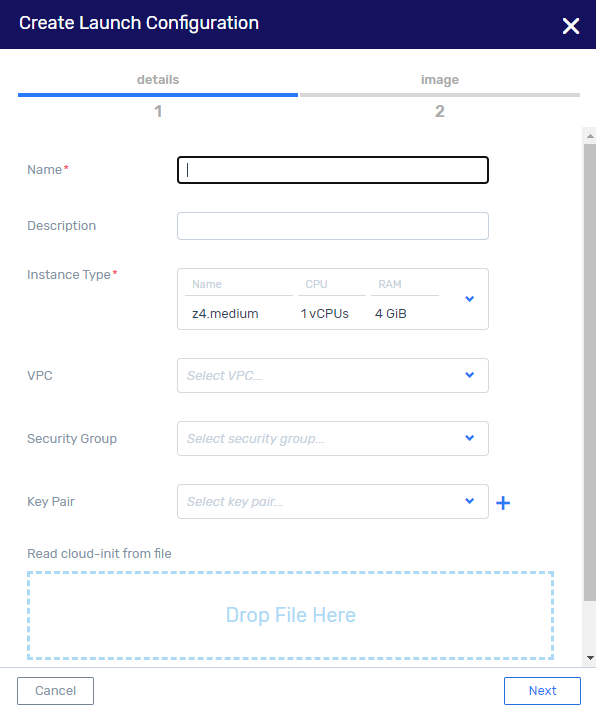
In the details tab, configure:
Name - name of the launch configuration to be created.
Description - description that will help identify the launch configuration.
Instance Type - defines the compute resources (CPU and RAM).
VPC - subnet of VPC in which the VM instances will be created. An IP address in this range will automatically be assigned to the VM instance upon creation, thus enabling the instances to communicate with other instances in the VPC.
Security Groups - (Optional) security group that will be used to limit/allow connectivity to the launched VM instance.
Key Pair - (Optional) the set of security credentials that will be used to ensure the identity of the user when connecting to the launched VM instance. You may either generate a new key or upload a key generated from another tool.
Read cloud-init from file - (Optional) drag and drop a cloud-init file to be used to initialize the launched VM instance post creation.
Click Next. The Image tab is displayed.
Select an image from available list or click + to create a new source image.
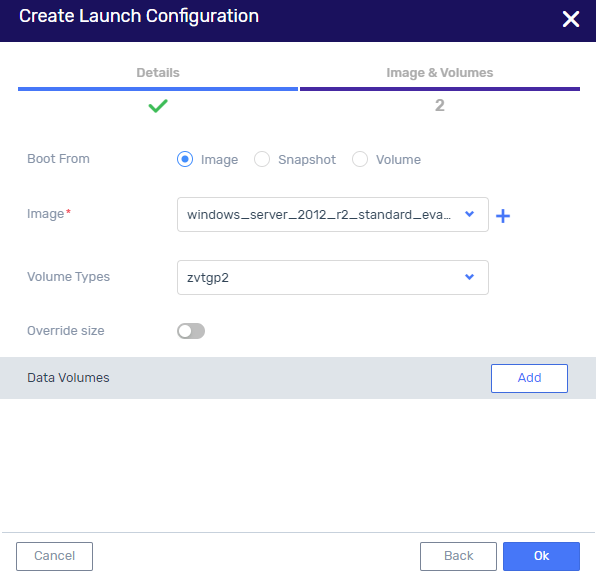
Use the Override Block Device Mapping option to either use the default block device mapping associated with the selected image, or slide the selector to the right position to override the default mapping. When override option is selected, configure the following:
Snapshot-Volume – select the Snapshot/Volume to be used for the block device mapping.
Volume Type - select the volume type from the dropdown list.
Override Size - option to keep default size, or slide the selector to override the default, and enter the new size.
To add Data Volumes click Add, and select a volume from the dropdown list or create a new volume.
Click OK. The image creation begins and its progress is displayed. When completed, the Action Succeeded message is displayed in the top right of the window, and the image is displayed in Launch Configuration list.
Creating Auto-scaling Groups
Creating Auto-scaling Groups (UI)
To create an auto-scaling group in the zCompute UI:
Navigate to the Compute > Auto-Scaling Groups view and select Create. The Create Auto-Scaling Group window is displayed with three tabs: Group Setup, Scaling Policy, and Advanced.
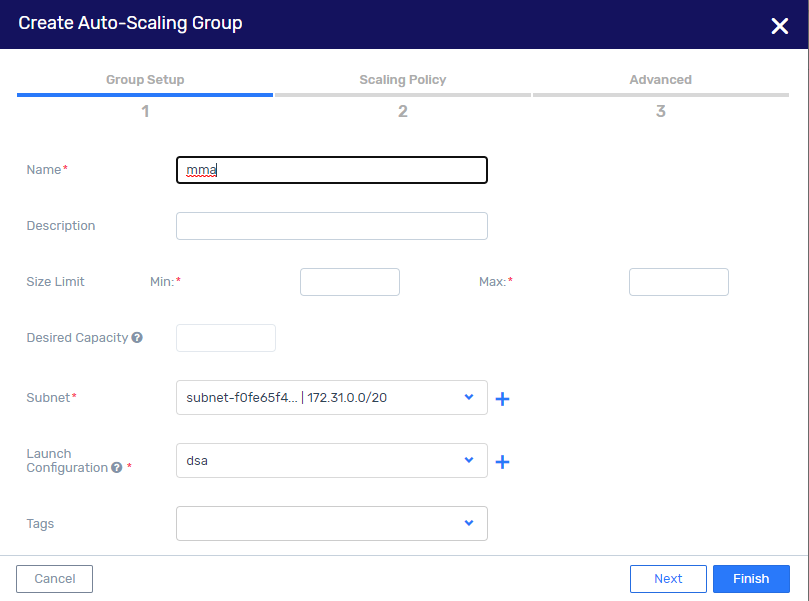
In the Group Setup tab, configure:
Name - name of the auto-scaling group.
Description - description that will help identify the auto-scaling group.
Size Limit - minimum and maximum numbers of instances that the group can contain.
Desired Capacity - target number of VM instances in the group. Use of this field depends on scaling policy configuration in the following tab as follows:
When no scaling policy is set: The desired capacity is the number of instances to be created in the group. It must be within the limits of the defined minimum and maximum. If no capacity is specified when the group is created, the system sets Desired Capacity to the minimum size in the Size Limit field.
When scaling policy is set: The desired capacity is the initial number of instances, after which the scaling policies can change the number of instances in the group.
Subnet - select the subnet from the drop-down list or select + to
define a new subnet.
Launch Configuration - select the launch configuration from the drop-down list or select + to define a new one.
Tags - select tag from the drop-down list or select + to define a new tag.
Click Next. The Scaling Policy tab is displayed. A policy can be set separately for CPU Utilization, Network Traffic - In, or Network Traffic - Out. If no scaling policy is desired, leave the slider in the default, left position. To set a scaling policy for any of the metrics, move the slider to the right and configure as follows:
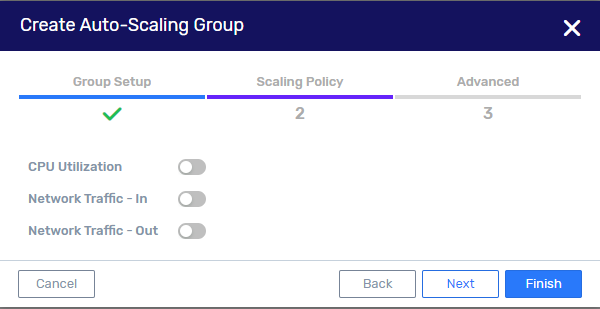
Estimated Warm-up - time (in seconds) until newly launched VM instance contributes to the scaling group aggregated metrics.
Target - above which alarm will trigger the scaling policy.
Disable Scale-in - disable scale-in (deletion of VM instances).
Click Next. The Advanced tab is displayed. Configure as follows:
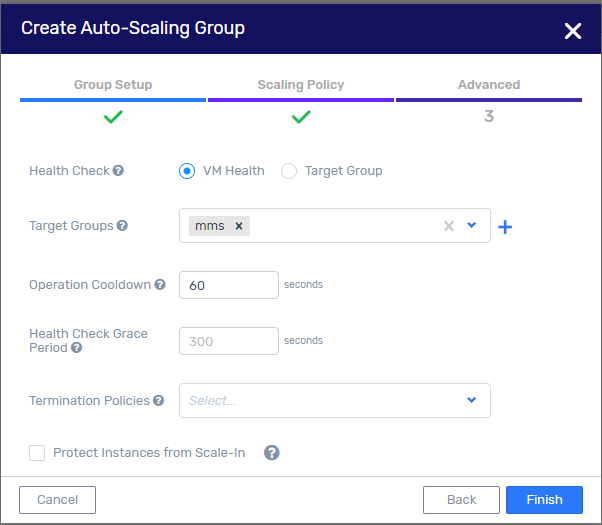
Health Check - mechanism used to determine the health of a VM instance in the scaling group.
VM Health - use VMware’s VM Monitor tool.
Target Group - use ELB health checks. This choice is available only if scaling group is associated with a load balancer target group.
Target Groups - select the target group from the drop-down list or select + to define a new one.
Operation Cooldown - minimal number of seconds between the completion of one scaling activity and the commencement of any other scaling activity. The cooldown period helps to ensure that auto-scaling doesn’t launch or terminate additional instances before the previous scaling activity takes effect.
Health Check Grace Period - minimal length of time before checking the health status of an instance.
Termination Policies - policies to determine which instances will be terminated in case of a scale-in event. Select one of the following from the drop-down list.
Default - terminate instances that have the oldest launch configuration.
Newest Instance - terminate the newest instance in the group. This policy is recommended when testing new launch configurations which should not be left in production.
Oldest Instance - terminate the oldest instance in the group. This policy is recommended when upgrading VM instances in the auto-scaling group to a new VM instance type. With this policy, older VM instances will gradually be replaces with new ones.
Oldest Launch Configuration - terminate the instance with the oldest launch configuration. This policy is recommended when updating a group and phasing out instances from a previous configuration.
Protect Instances from Scale-In - when selected, newly launched instances are protected from termination during scale-in.
Click Finish. When scaling policy creation is completed, the Action Succeeded message is displayed in the top right of the window, and the policy is displayed in the Compute > Auto-Scaling Group list.
Get a consultation from a manager!
Do you need to clarify the details? Discuss the requirements? Do you have a difficult project? We will help you find the right solution.
'/%3e%3cdefs%3e%3clinearGradient%20id='paint0_linear_1362_1644'%20x1='98.2981'%20y1='-36.0977'%20x2='98.2981'%20y2='180.309'%20gradientUnits='userSpaceOnUse'%3e%3cstop%20stop-color='white'%20stop-opacity='0.8'/%3e%3cstop%20offset='1'%20stop-color='%23B5E275'/%3e%3c/linearGradient%3e%3c/defs%3e%3c/svg%3e)